Saturday, January 30, 2010

Shari's Tips for a Long Lasting and Stylish Wardrobe

1. Before you start shopping, analyze your closet carefully.  Take note of the pieces you already have and the pieces you need.  More importantly, take note of which brands, designers or stores that have lasted the longest in your wardrobe.  These are the stores that you should return to.
-Long lasting stores in my closet: Mango, Anthropologie, RW&Co, Club Monaco, Winners, Delia's, Guess
-Short lived: The Gap (with the exception of jeans and one sweater from 2004), H&M, Zara, Le Chateau, American Eagle (with the exception of hoodies and some sweaters)

2. While you're looking through your closet, think about which direction you want your wardrobe to move in.  Does it need a makeover, or just an update?  Do you want to change your look, or just give it diversity?  I am always drawn to youthful clothes (I caught myself shopping in the Junior section of Winners the other day), and I have to make a concious effort to move past this as I may now be too old to wear umbrellas on my shirt.

3. If you are buying a super trendy piece that will probably go out of style within the next year or two, such as a this "mixed media" dress from Delia's, buy a cheaper piece, even if it isn't well made.  Chances are the item will last as long as the trend.  If you are buying more classic pieces, such as sweaters, knit tops, or bottoms, spend more money for higher quality.

4. If you already have an item of clothing similar to one you're eying in any given store, pass on it.  This is difficult to do since most people gravitate towards similar items of clothing, but having too many similar items in a wardrobe will create the urge to do more shopping.

5. Consider your lifestyle.  I love casual skirts and dresses but I do a lot of walking in the winter, which make these pieces impractical in terms of warmth and coordinating footwear.  I instead go all-out for dinners, parties, etc., and have many fancy dresses and skirts to choose from.  Similarly, I only own three pairs of heels, since I do too much walking to get much use out of them.  Instead, I invest in pretty flats, such as these Stella McCartney Adidas shoes.  These are from two seasons ago and they're one of the best purchases I've ever made.  I strongly suggest checking out her line.

6. If fit is often a problem, consider buying a size larger and paying extra money to have your piece altered.  I have wide hips but very narrow shoulders, so I always fit to my bottom half and have the top taken in.

7. If tailoring is not an option (money restrictions, structure of a given piece) and you are not 100% satisfied with the fit of the piece, don't buy it.  If you have any misgivings at all about an article of clothing, don't buy it.  I've often left stores with pieces I thought I'd warm up to, but wearing them always left me feeling awkward and out of sorts.

8. After you return from your shopping trip, get rid of clothes that you a) never wear, or b) don't feel fantastic in.  Exchange quantity with quality.

9. In contrast, buy cheap jewelry to pair with fewer articles of clothing in order to give variety.  I went shopping with a student of mine today, and she reminded me of the great jewelry at Forever 21.  I always regret buying clothes there since they fall apart so quickly, but if your look needs a quick refresher, new jewelry is the cheapest and fastest way to do it.  This necklace is available at Forever 21 for $5.80.  Other great places to buy cheap jewelry include H&M, Le Chateau, and Smart Set.


10. Buy pieces that are themselves versatile.  This wrap dress comes from Fashion Crimes, and can be worn unlimited ways. 


Some more examples of these tips directly from my wardrobe:

Here I am pictured wearing a sweater from Delia's (2005) and a necklace from Le Chateau (also 2005).  Both items still exist in my wardrobe!

(Left) This photo is from 2006.  The top is from Delia's and the necklace is from American Eagle (a cheap find).  Both still exist in my wardrobe!

(Right) I bought this shirt somewhere on Bloor Street West, and was unsure of the purchase at the time.  This was the first and last time I wore it.  Not only is it too big for me on top, but the colours are so primary that it looks childish and dated.  I felt uncomfortable the whole time I was wearing it.


This was in 2007.  The top is from Mango (on sale for less than $20 if I remember correctly) and the necklace is from H&M.  Both are still in my wardrobe!


I'd love to start a discussion on this!  Let me know where you bought your long lasting clothes!  I'd also love to hear your own personal shopping tips and tricks!

Tuesday, January 26, 2010

Do's and Don'ts to buying furniture - by Donna


Do's
Do scrutinize the room you are furnishing before you purchase anything.
Do search for pieces that are attractive on their own, and that will also enhance the entire space as a whole.
Do your homework. It is necessary to take the time to research.  Look on the Internet, in decorating books, in magazines, and in stores to see what is out there.
Do check on the company.  When spending money on furniture, it is paramount that you buy from a reputable dealer. Most companies can be easily checked on by doing a basic background search.
Do invest in good quality furniture. When buying furniture for a room, start off by splurging on one fabulous piece, and expand from there.
Do be creative and put your imagination to work.  For example, a cabinet meant for a bedroom could work in another area of the house.  An article of furniture like a wrought iron table made for the outdoors can also work inside. Try different scenarios to see which ones work.
Do check the ads for upcoming designer sales.
Do go with your instincts.
Do buy ceiling light fixtures in the appropriate sizes for rooms.
Do purchase lamp shades in similar colour tones, if they are going in the same room.  Do mix up the bases though.
Do look for unusual pieces that no one else will have.
Do buy furniture that is easy to care for.
Do talk to the dealer about a discount, if you are buying a few pieces at the same time.
Do check out estate sales and eBay.
Do buy multi functional furniture pieces.

A great example is this sofa from Baxton. It works as a regular sofa, it can turn into a sofa bed, and also separates into two swivel chairs.


Do buy earth friendly and green furniture.
The table and chairs shown here, from Ethan Allen's American Artisan collection, is an example of earth friendly furniture.


And this beautiful bed is from Harden's eco-friendly line.

The sofa pictured here is from Broyhill's environmentally friendly, upholstery collection.


And the tv stand below is an example of an echo-friendly product that is available from the Sauder Woodworking Company.


Don'ts

Don't buy all your furniture in the same texture or colour.  For example, furnishing a room with all leather pieces is not ideal, just as using the identical colour for a sofa, love seat, and chairs that are all in the same room would be way too much.
Don't be afraid to mix furniture from different collections.
Don't buy trendy furniture, unless you have a budget that allows you to change your style often.
Don't settle. Because you want a new sofa doesn't mean you will find it the first day you go out looking.
Don't impulse buy. What is the point of buying another chair, if you don't have room for it?
Don't buy furniture that is uncomfortable.
Don't be in a rush. If you find a piece you love, and it is not in stock, it is worth waiting for.
Don't buy huge pieces of furniture for small spaces.
Don't buy small pieces of furniture for big spaces.
Don't let sales people talk you into buying anything you are not 100% certain of.

Sunday, January 24, 2010

Sashes and Bows on Wedding Dresses -by Shari


Obviously, I love sashes and bows.  My own wedding dress had a brown bow tied at the empire waist.  While I didn't put a lot of thought into it at the time of purchasing the dress, I later realized that my body was more suited to a small bow rather than a large one, since I am so short and small-framed.  A large one would have shortened my torso and possibly made me look wider.


Here are some dos and don'ts of wedding day sashes.  Let's start with the bad news.


There is little I like about this Alfred Angelo dress. The colour of the sash reminds me of my old teatree shampoo (that's never a good thing). Maybe this would work better if: 1. the sash was wider; 2. the sash was plain and not detailed; 3. it was higher up. The detail of the sash, the slimness of it, and the placement all draw the eye to the widest part of this model's body and make her waist look much wider than it actually it.


Here is my least favourite example. I don't know what this Maggie Sottero designer was thinking. From the time we hit puberty, underwear becomes about lifting your boobs and making them look under control and symmetrical. Why on earth, on your wedding day, would you choose to make your boobs look lopsided?

If a sash that meets in a bow at the bustline, please please please put the bow in the center and under the boob.


Help!! Somebody TP'd this bride on her wedding day!


With this Watters dress (the above dress was Watters as well), I enjoy the sash itself, and the dress in general, but the dramatic effect the bow creates paired with the dramatic effect of the deep V of the bodice is just too over the top.  I am also not a fan of the hair or hair piece; it's a lot of interest on the bride's left side of her body.


I love the colour of this sash (I chose it myself from the David's Bridal website because purple is my favourite), but that's all I like.  I'm not a fan of the cupcake skirt to begin with, but paired with a long flowing sash?  It really does look like the icing on the cake.  Also, wearing a veil with a sash this long would be tricky; there are too many horizontal lines here, sending the eye left to right instead of up and down.


This is another David's Bridal dress tha makes me cringe.  This is completely the wrong dress for this girl's body.  The halter top is so ill-fitted that it flattens her and doesn't create curves.  The sash cuts off her torso, again at the widest part, and makes her upper body look like a rectangle.  There is nothing on top to balance the extra fabric of the bottom.  Very poorly done.


This Sincerity Bridal gown would be alright if it weren't for the sash and the choker (!).  If there is going to be a defined bodice separate from the skirt (with different fabric), then the sash has to sit at that line, or it should be removed completely.  Having it so much above the top of the skirt just doesn't work for me.


And now with the good news!  This Eden Bridals dress uses a sash quite nicely.  The entire dress is satin with a lace overlay, so without the definition of a line between the bodice and skirt, this sash is free to sit at the natural waist without competition.  Too bad this model's wearing my mom's 1985 potpouri flowers in her hair.


This is another David's Bridal gown, but this one I really like.  I love lace gowns, but sometimes the combination of a satin sash and lace gown do not work; not so here.  The white sash here is the perfect size and gives the whole look a bit of a modern twist.  Also, because this bride is petite, the size of the sash adds emphasis to her curves.  On an already curvier bride, I would make the sash wider.


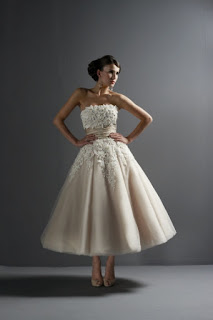
I just discovered this designer a few minutes ago: Justin Alexander. I think this might be one of my all-time favourite wedding gowns. There's nothing I don't like about this dress. I love the a-line of the skirt but also love that it doesn't go right to the ground, allowing for a full day and evening of easy mobility. The sash is not the main focus of this dress, but rather artfully breaks up the detail of the bodice and skirt top. The model wears her hair the same for all dresses of this collection, but from this angle it works really well. Wearing hair down with a dress like this would be a definite mistake. From the other side the hair might have a bit too much going on and may compete with the dress, although the look is definitely glamourous and dramatic. What do you think?


Saturday, January 23, 2010

Design and Decorating -by Donna


This section of the blog will be devoted to the subject of designing and decorating. I will be adding new material from time to time, so be sure to check back.

Though I don't profess to be an expect in any way, I have read countless books, more magazine articles than I could have ever imagined, and researched for hours and hours, on the topic of interior decorating. Sometimes I learn important pieces of information from exploring these avenues, and sometimes I get wonderful inspirations. And there are other times when I am fortunate enough to come up with some of my very own ideas.

Part 1 - Your imagination and taking down the walls

The first topic I want to approach is the issue of where to begin when decorating an entire house or apartment. There are so many factors to consider when taking on a job like that; at times it can be overwhelming. It will be to your advantage if you take your time, and if every decision is thought out carefully.

So, where to begin, that is the question? To make it easier, there are a couple of tools needed that will help get the process underway. The first one is a journal. You can keep magazine clippings and sketches in your journal. It's also a good place to keep track of colours you are thinking about, the budget you are working with (including sales receipts from your purchases), and any other decorating ideas you have. With the amount of decisions you are going to be making, it can be so easy to forget even an important detail, so having a journal is essential.


The second, and one of the most important tools you will need, is your imagination.  When we built our house, I visualized what colours would look best, and decided against different colours for different rooms, as that would be too busy for my tastes. I wanted something that would be cheerful, even on a gloomy day.  I wanted something that would be tranquil, after a long day at work. I didn't want everything to match, but wanted a smooth flow from room to room.  Finally, I wanted to have a neutral background.  Throughout my research I was drawn to rooms that were painted white, and this would become my blank canvas against which interesting furniture pieces would stand out. However, I also wanted to have some contrast, so I decided to have light coloured wallpaper in a few of the rooms in our house. I made a note to make sure any wallpaper I chose had a background of white, and white became the connecting colour in each room.

The most common mistake made when decorating a home is treating each room as an individual space instead of as part of an overall design plan.  Not every room has to be the same colour, but having a connecting element will ensure a nice flow between all the rooms.  The structure of most houses is open enough that different rooms can be seen from the same place, as the above photograph demonstrates (from House to Home), which makes colour coordination all the more important.  I suggest you choose three shades of one colour and work with those within your home.  The unity will create cohesion between the rooms, and the diversity will create contrast and definition of the space.

As you proceed with your decorating, continue to keep the big picture in mind.


As I was planning the different rooms in our home, I tried to imagine what the house would look like if all the walls between each room were non existent. If all the walls were gone, and everything still looked cohesive, then I knew I was on the right track. You can see from the above photograph (Decodir) that even though there are two distinct spaces without wall separations, each look works well, both individually, and together. Picturing your own space without walls, using this photo as a bit of a guide, will give you an idea of how to use your imagination and will allow this concept to work for you.  


Your imagination will be your number one tool as you continue to picture the end result throughout each step of the process.

Halter Wedding Dresses -by Shari

A halter dress is a good choice for women of all body shapes and sizes; the upwards line of the straps lengthen torsos, and the angle of the straps slim shoulders. However, there are right and wrong ways to wear a halter wedding dress.


This dress on the left is from Alfred Angelo. I like that the model is wearing her hair neatly up, which, along with the deep V created by the halter, creates a statuesque appearance. However, the bodice of this dress reminds me of my grade 11 crochet bathing suit. My bathing suit was lavender, but still. I also do not enjoy the contrast between the re-embroidered lace bodice and the silk skirt; this contrast in cooperation with the A-line is what gives the dress the "body suit" look.


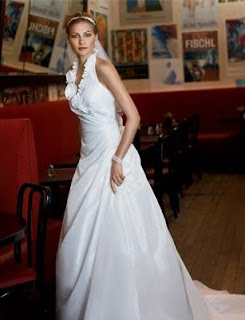
This dress from David's Bridal doesn't have any of the above problems. Made of faille (a new word for my vocabulary!), the a-line of this dress is not nearly as pronounced as the one above because there is no line where the bodice stops and the skirt begins. I also enjoy the sweetheart neckline which accompanies the halter top. However, do not be deceived: even though David's Bridal got this one right, a quick peak at the website shows that they are also guilty of designing dresses that appear to have a tearaway skirt for a quick swim in between ceremony and reception.

Also, if I were the stylist for this photoshoot, I would not have parted the model's hair so severely off to the side; this takes away completely from the illusion of height that the design of the dress creates.


On the topic of David's Bridal, I have always been a huge fan of their designs, and their prices! Compare these two pieces:


The first dress is from the Vineyard collection at Priscilla of Boston, in the price category of less than $2000. The second is from David's Bridal, priced at $499. Regardless of the price difference, I prefer the David's Bridal dress, for real life anyway. I know I've already said this a few times on this blog, and I'm sure I'll say it again, but a bride should never look like she's dressing up as a bride. The Vineyard dress is great for the runway, but that's all.


As a frequent "Say Yes to the Dress" watcher, I've noticed a trend that goes along with halter top dresses: see-through bodices.
This ADK Canada dress is embarrassing. It's ice capades meets Phantom of the Opera, and not in a good way. There is a proper way to do see-through fabric!


Nicole, a "real bride" as they'd say on theknot.com, is wearing a Private Label by G dress from the Ginza collection, which saves the sheerness for the back of the dress! Gorgeous!

I am also a fan of the way Nicole decided to wear her hair! While I did say earlier that parting your hair is a no-no, Nicole's hair has a much softer look to it than the model in the earlier example. Also, as a veil would have looked busy and confusing against the sheer back of the dress, she chose to wear a small yet interesting hair comb which kept the gaze sweeping in an upwards direction. Well done Nicole!
(Also, though I don't plan on focussing on menswear for awhile, I really like Cort's white on white look!)

If you are interested in halter tops or halter dresses, for wedding or other occasion, and would like tips on putting the outfit together, please let me know!

Thursday, January 14, 2010

Ten Ways to revive a room -by Donna


Ten ways to revive a room.

Sometimes you just need a change. Reviving a room in your home can be a simple task like changing a few accessories. Or if you want to take it a step further, adding a fresh coat of paint can drastically transform any space. The following examples are just a few out of many possibilities there are to perk up any room.

1. Add a fresh coat of paint. It is surprising how far a fresh coat of paint will go to improving the appearance of any room.
2. .Paint the ceiling a shade off from the colour of the walls. This creates the slightest contrast, and you will not believe the impact this will have on a room.
3. Add a crown molding. Do not underestimate the power of a crown molding. If will turn an ordinary room into a room that has so much charm and character.
4. Add a fireplace. There are many styles of gas and electric fireplaces available, in every price range. The photograph below shows an electric fireplace in a sitting room. Or you can buy or have a custom mantel made, that would be used simply for decorative purposes. You can see from the above photos, what a difference this decorative custom made mantel makes to the room.

5. Buy new lamps or have existing lamp shades recovered.
6. Add a throw rug to the space.
7. Buy a new chair or recover an existing one.
8. Change the prints on the walls.
9. Add a large floor vase.
10. Purchase throw cushions. By adding several cushions to a sofa, it will give it an entirely different appearance.

Saturday, January 9, 2010

Canada's Bridal Show -by Shari

I'm going to take a break from talking about necklaces and other accessories to talk about the Bridal Show, which I attended by myself last night. First of all, since beginning the planning of my own wedding last year, I've felt like the wedding industry needs a makeover. Going to the bridal show confirmed this for me.


The trend seems to be hiring companies that do it all, from photography/videography, flowers, decorations, cake, music, etc. I'm too new to the industry to know an answer to this question, but companies that have mulitple services, do they do anything one thing particularly well?


The table settings were all beautiful, though I don't know if any of them would work large scale. It was more as though I was looking at options for an intimate, 10-person dinner, rather than a 100+ wedding. The flower colours were fairly bright, and the orchid branches we had at our wedding seem to be popular.


Table cloths were mostly whites, browns, and blacks, and all organza. Chair bows were also organza. My favourite was a set up by Fairytale events that looked sort of like this.


There were also many set-ups that incorporated something I can only think to call a "Wedding Sofa", but I can't find a picture of anything that looks like it. Anyway, another big trend was the use of damask patterns. One of the first set-ups I saw had a damask table cloth and a matching damask backdrop. Way too busy. Some other table settings used the damask idea as a table runner, which was much nicer. Invitations had damask patterns as well, which I obviously like since ours was similar.


iCakes had the most beautiful cakes there, and had samplings of different flavours. My favourite cake was one that had two tiers and a fountain, kind of like this, but more modern looking.


Two other trends I saw and liked were 1) jewels in bouquets, and 2) brooches on men instead of pocket squares or boutonnieres. I'm still searching for a picture of this sort of thing, so more on that another time.


At 7 p.m. the fashion show started, and I of course stuck around for the whole thing.

Now, I have to preface this critique by saying I am generally not a fan of white wedding dresses, and find they all look the same. However, even by my low standards, I couldn't believe how underwhelming the wedding dresses were to me, and to others in the audience too. There was no dress that made anyone gasp, or swoon, or anything. Mostly other women were pointing and

criticising. Some dresses were so wrinkled that it looked like they had just come out of a suitcase. One dress had parts of it falling off as the model walked down the runway. Another was so see-through that we could all see the model's cups and thong. They were all ill-fitting to the models who wore them, and were paired with terrible accessories (most dresses, regardless of their shade, were paired with stark white shoes).


Amongst the comforters-turned-dresses, I saw one dress that I liked. It was by Rodney Philpott, and I've written to the company requesting a picture. I haven't heard back yet, but hopefully I'll receive it before my blog entry dedicated to wedding dresses. I also saw a coat by Ross Mayer that I adored. I'm partial to coats on wedding days as I wore one myself.


This brings me to my first statement: the wedding industry needs a makeover. Decoraters and designers are too concerned with following pre-existing trends. Comforter dresses use to drop jaws and fulfill the wishes of every little-girl turned bride. Now they are too common place to have that effect, so designers must take it upon themselves to create a new standard in princess gowns. Later on in the month I will have an entry dedicated just to wedding gowns and I'll talk more about this then.

One last thought that is not related to anything I've said so far: the wedding industry is far too heterosexual. When I was calling venues to ask about details back in late 2007, I was always offended when they asked me what my groom's name was. I would have preferred something gender neutral, like fiancee, or partner. On every ballot at the bridal show, or every contact sheet, the bride's name and information went at the top, followed by the groom's information way down below. If I was marrying someone of the same sex and went to the bridal show, I would feel very discouraged and out of place. Wedding trends and customs need to catch up to the laws passed in 2005. As I said, the wedding industry needs a makeover.
More on same-sex weddings another time!

Wedding Favors -by Donna


When it comes to weddings, there is no such thing as doing anything too early. Even though I consider myself to be an organized person, I was not prepared for the length of time it took to accomplish many projects relating to my daughter's wedding.


One example was making the wedding favors, which were Italian Confetti Candies wrapped in tule. Designing the wedding favors, finding all the items needed to create the favors, then going about the task of making them, took much longer than I anticipated. If you are thinking of having confetti wedding favors at your wedding, I would suggest you get started on them as early as possible, especially if you are planning on making them yourself.
Something as simple as purchasing the candies used for the favors may seem like an easy enough undertaking, and it can be, but you can't count on it. Some candies are more readily available than others, at different seasons throughout the year. Tracking down the type of candy, in the correct colour that we wanted for my daughter's wedding favors, took me the better part of two days. Some places I called had the candy, but were not going to have the colour we wanted until the following season. Some places had the candy, but not in the quantity we wanted. After several phone calls, and hours of searching on the internet, I finally found exactly what we were looking for.
Once we had the candy, I went about looking for just the right colour of tulle. It is surprising just how many different shades pink tulle is available in. Whether tulle or any other type of materials are needed for the favors, I would highly recommend bringing a few colour swatches (that are related to the wedding colours) with you when you go shopping for the items needed for the favors. My daughter's dress was a gorgeous pink colour with beautiful gold sequins on parts of the dress. We matched up the tulle as closely as possible to the dress, and we wanted to purchase gold sequins to sew on the favors. That way there would be elements of the bride's wedding dress tied into the favors. Coming up with the exact sequins we wanted was another job that wasn't as easy as I thought. Who would have thought there could be so many types of sequins, in so many sizes? And even with all that was available, I couldn't find sequins that were small enough so they wouldn't overwhelm the delicate favors. In the long run, I ended up buying a few meters of a fabric trim that had gold sequins sewn onto it. I then had to separate all the individual sequins from the fabric it was sewn to, one by one, which took quite a bit of time. The most time consuming job of all though was actually sewing the individual sequins on to each favor.
When I initially offered to make the favors I knew it would be a fairly big job. However, I underestimated the amount of time it would take. Each favor took me an hour to make, there were 150 guests at the wedding...you do the math! At one point I jokingly said, wouldn't that be something if the night before the wedding I was still making the favors, and guess what, that is exactly what happened. So the moral of this story is better to have everything done, well in advance. And I can't stress enough to never settle. If you want a certain item needed for your favors, keep looking, you will find it, it just may take a little more work than you thought.

A few more reflections about wedding favors.

The tradition of wedding favors has been around for hundreds of years. Originally bride and grooms gave wedding favors to their guests as a way of sharing their good luck. Many cultures had their own customs and protocol when it came to favors. The practice of giving wedding favors has evolved over the years and now there are no clear cut rules; the bride and groom can choose what best works for them. Regardless of the reason, giving a small gift is a lovely gesture to thank your guests for coming.

Regardless who is making the favors for your wedding, a really good idea is to make a few trial favors well in advance of the wedding. This will give the bride and groom an idea of what the finished product will look like. And the bride and groom can make sure it is what they really want. Asking the couple for colour and size preferences, and if there is anything special they wish to have on the favor, is a great starting point. This photograph shows a few of the trial favors I made.


Another important factor to consider on the subject of wedding favors is deciding if the favors will be placed at each guest's table setting, or if the bride and groom will be handing them out to each guest. I have attended weddings where both of these options were done, and I prefer it when the favor is placed at each guest's place setting. Not only do the favors add colour and interest to the table, it also saves time. You can see from the below photo just how lovely the table looks with the favors.


Our most important consideration for the favours was to be original. We wanted to have favors that were different and that didn't look store bought, or mass produced. Granted the design we came up with was a little tedious, but the end result was so worth all the time and effort. If you are making your own wedding favors, there are a few other important aspects to keep in mind. If you are experienced at making crafts, and have done some sewing, then you should be fine. However, if you are not used to creating things from scratch, choose a favor that is simple to make, otherwise you may get overwhelmed with the project. Either that, or hire someone to make the favors. With everything else you will have to consider for your wedding day, you don't want to be stressed out further with the job of making your wedding favors. Plan ahead, and allow enough time to get your favors finished well before the wedding day.

With a little thought and creativity, every wedding can have gorgeous and distinctive wedding favors. Shari and I have some great visions and inspirations for wedding favors. Feel free to contact us, if you wish to discuss having the most unique favors for your wedding.

Friday, January 8, 2010

Donna's first post.

From a mother's point of view.

I am really excited to be sharing this blog with my daughter, Shari. Hopefully, everything we learned from planning Shari's wedding will be of some help to you. Working with Shari and Chris to make their wedding day as special as possible was a dream come true for me.

For my first post I want to share, from my point of view, what I think is the most important factor as far as planning a wedding. And that is to never settle. In other words, if you want something for your wedding day, you will have to work extremely hard to get it. If you are prepared to put in the thought, the time, and effort, then there is not a single thing you will not be able to achieve. Some tasks may take days, if not weeks to accomplish, some may take actual begging, which I have to admit I had to do on at least two occasions. In the long run, if you are prepared to go after what you want, you will be able to accomplish everything that is humanly possible to make your wedding exactly the day you have dreamed of.

Best wishes.

More on coordinating necklaces with clothing -by Shari

I have one dress that only has one shoulder strap. I'm not big on asymmetry in my clothing, but as long as it stops at asymmetrical straps (none of this one arm covered, one arm bare business), I can deal with it. However, what I can't deal with is this:

Whoever dressed Sienna Miller for this photo shoot should be ashamed. That necklace would have made a bold statement against a bare collar bone. Against an asymmetrical dress it looks busy and overdone.

I'm going to search for a picture of a one-shouldered dress paired with a necklace that actually works, but until then I strongly recommend one or the other.


In this photo of Taylor Swift, you can see she opted for earrings instead of a necklace while wearing a similar gown. Even though the dress has more material than the one worn by Sienna Miller, Taylor Swift looks more natural and at ease.